Building a collaborative text editor in Go
Exploring how pairpad was built in Go.
This post was originally written on 2022–12–17.
The first half of this article discusses about introducing real-time collaboration properties to text editors, and the second half discusses how pairpad was built.
Feel free to skip to the second part if you're already familiar with how collaborative editing works.
Introduction
7 years ago, I built a text editor using Python 2.7 and Qt. It was one of my first projects, and it was fulfilling - seeing the editor’s buffer getting updated with the press of a key was a “wow” factor.
Recently, I wanted to try my hand at building text editors again, but I was looking for something more interesting. That’s when I decided to build a collaborative text editor called pairpad from scratch in Go.
“Why?”, you may ask - I thought it would be a fun challenge. And building it was exactly that - fun!
The primitives: text editors
Before delving into collaborative text editors, let’s understand what a text editor actually is:
A text editor provides an interactive interface for editing text, typically supporting features such as cursor movement, text selection, copy and paste, and various text formatting options.
At the core of a text editor is typically a data structure that represents the text content. These data structures allow for dynamic and efficient insertion and deletion of characters without requiring extensive shifting of existing text.
When a user performs an operation on the text, such as insert or delete, the text editor translates these actions into low-level operations on the underlying data structure. For example, when a character is typed, the editor inserts it at the current cursor position by updating the data structure accordingly. Similarly, deleting a character involves removing it from the data structure and adjusting the positions of subsequent characters.
To support more complex operations, text editors often use additional data structures. These structures are used in implementing features like undo/redo, search and replace, syntax highlighting, code completion, and other advanced editing functionalities.
To understand what these operations look like, let’s take a look at this diagram:
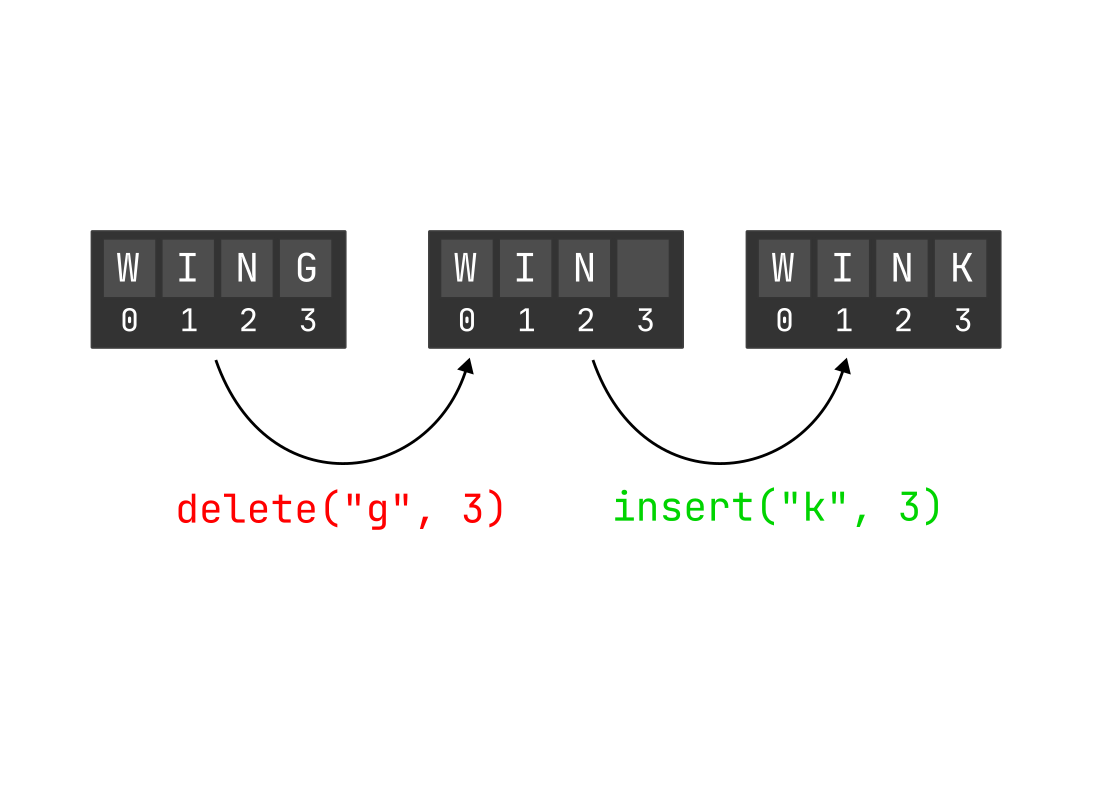
This diagram presents a basic depiction of how a text editor functions. In this example, the text editor has a buffer of size 4 (for demonstration purposes) and stores the content “WING” within the buffer.
An operation is performed to delete the character at position 3, resulting in the removal of the content “G” from that position.
Following that, an insertion operation is executed at the same position (3), adding the character “K”. The buffer now holds the content “WINK”.
Disclaimer: all editors might not work like this.
This is fine, but let’s look at how collaboration would take place in this setting.
Introducing collaboration in text editing
Single-user text editing is relatively straightforward. When a user types or modifies text, the editor updates its content accordingly. However, multi-user text editing introduces complexities as it involves real-time collaboration among multiple participants.
So, what are the challenges associated with multi-user text editing?
- Conflict resolution: One of the main challenges is managing conflicts that may arise when multiple users attempt to edit the same portion of the text simultaneously. For example, if two users modify the text at position X, it becomes crucial to determine whose changes should take precedence to ensure that the final result is consistent.
- Real-time coordination: Ensuring a seamless user experience is another challenge. In a collaborative setting, users expect their edits to be applied immediately, similar to the responsiveness of single-user text editing. Achieving this real-time experience requires efficient handling and processing of each operation to provide smooth interactions for all participants.
- Synchronization among multiple users: Maintaining synchronization of the shared content across multiple users is a significant challenge. When a new user joins the editing session, they need to receive the current state of the text, including all the modifications made by other users. Likewise, any changes made by one user must be propagated and updated for all other users in real time.
Collaborative text editors overcome the challenges of multi-user text editing by employing a range of techniques to enable real-time collaboration and synchronization.
To understand how they work, let’s try to model a basic collaborative text editor. But before we do that, let’s begin by using a simple text editor and familiarizing ourselves with the challenges mentioned earlier.
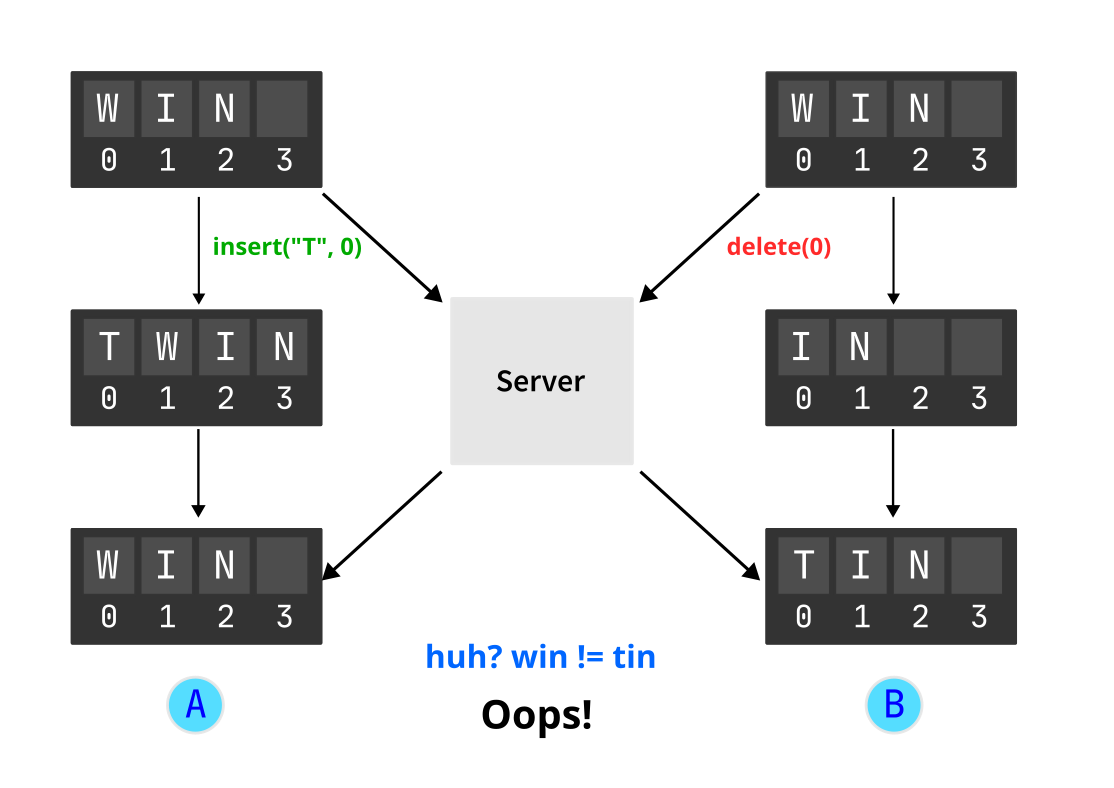
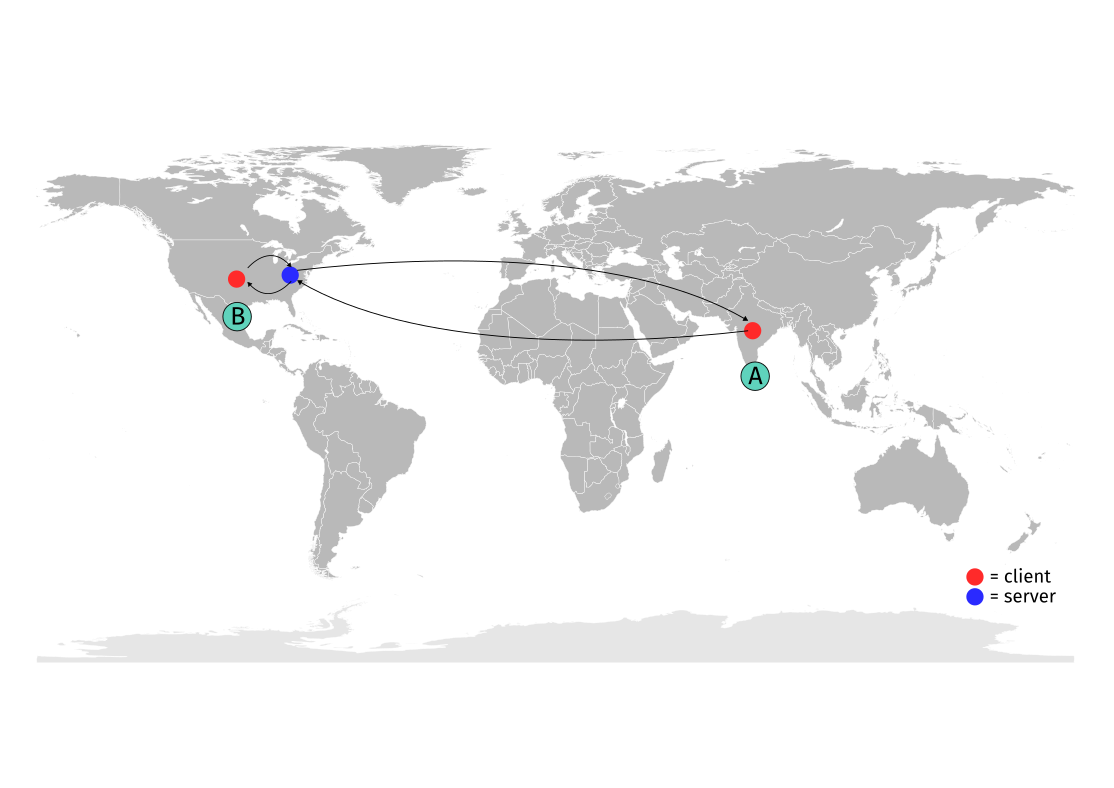
In the above diagram, we have set up a server that sends operations to each client. However, the clients don’t implement any conflict resolution mechanism. This is the reason why the documents didn’t converge.
Divergent state is a big no-no when it comes to collaborative editing. But let’s dissect what happened:
- User A adds the character “T” at position 0. This operation is done locally first, and then sent to the other client through the server. The local state is changed to “TWIN”.
- Simultaneously, user B deletes the character “W” at position 0. This operation is also done locally first, and then sent to the other client through the server. The local state is changed to “IN”.
- While user A had its local state as “TWIN”, it receives the operation from user B via the server. This operation is applied locally, and now the state is changed to “WIN”.
- Similarly, user A’s operation is received by user B, and the local state changes from “IN” to “TIN”.
So…. how do we fix this?
Let’s add a black box to this whole situation.
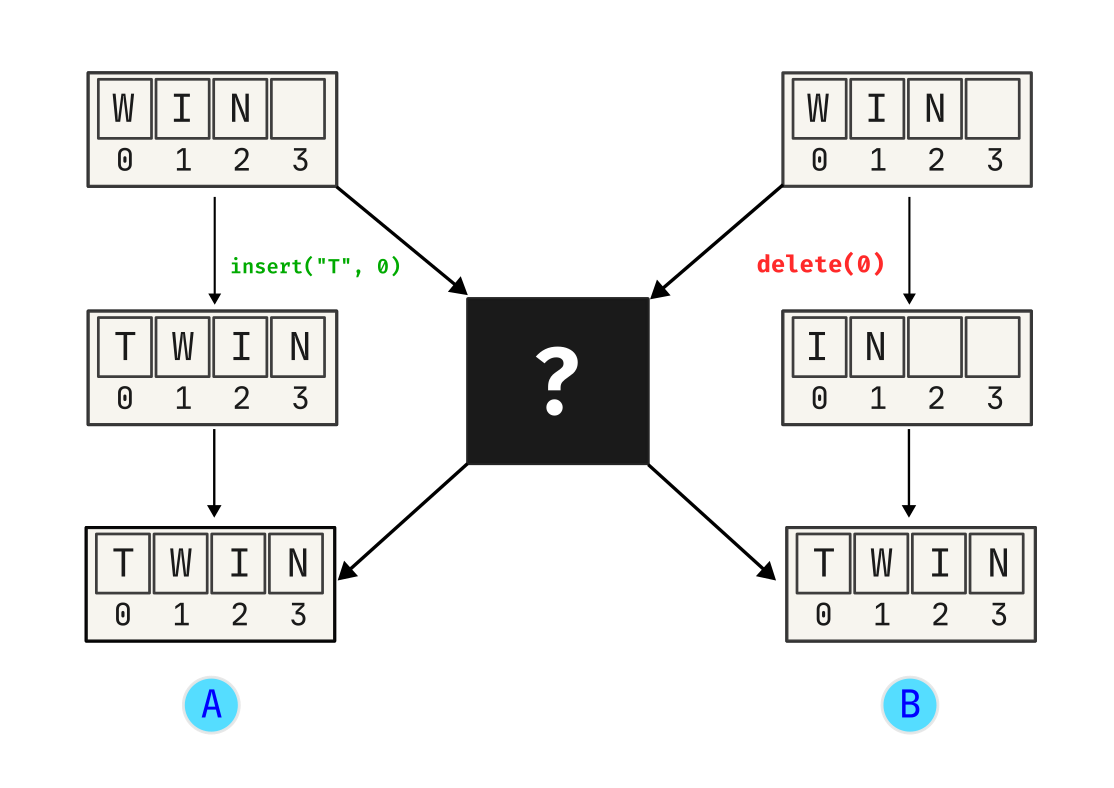
This black box should handle conflict resolution and provide the ability to perform real-time collaborative editing.
The two options for this black box are:
- OT (Operational transformation)
- CRDTs (Conflict-free replicated datatypes)
Let’s understand each of them in detail.
Transforming operations
Operational Transformation (OT) is a fundamental technique employed in collaborative editing systems to ensure consistency and concurrency control.
The basic unit of OT is an operation, and the two possible operations are: insert and delete. Any operation being performed on the document results in a new document state.
OT solves the issue of concurrent editing by transforming each operation using the previous operation, before it is applied to the document.
To understand this in a better way, let’s use OT as the black box in our previous example:
Let’s assume that we have two users A and B, where A tries to change the version number to 1.21. This change is applied locally:
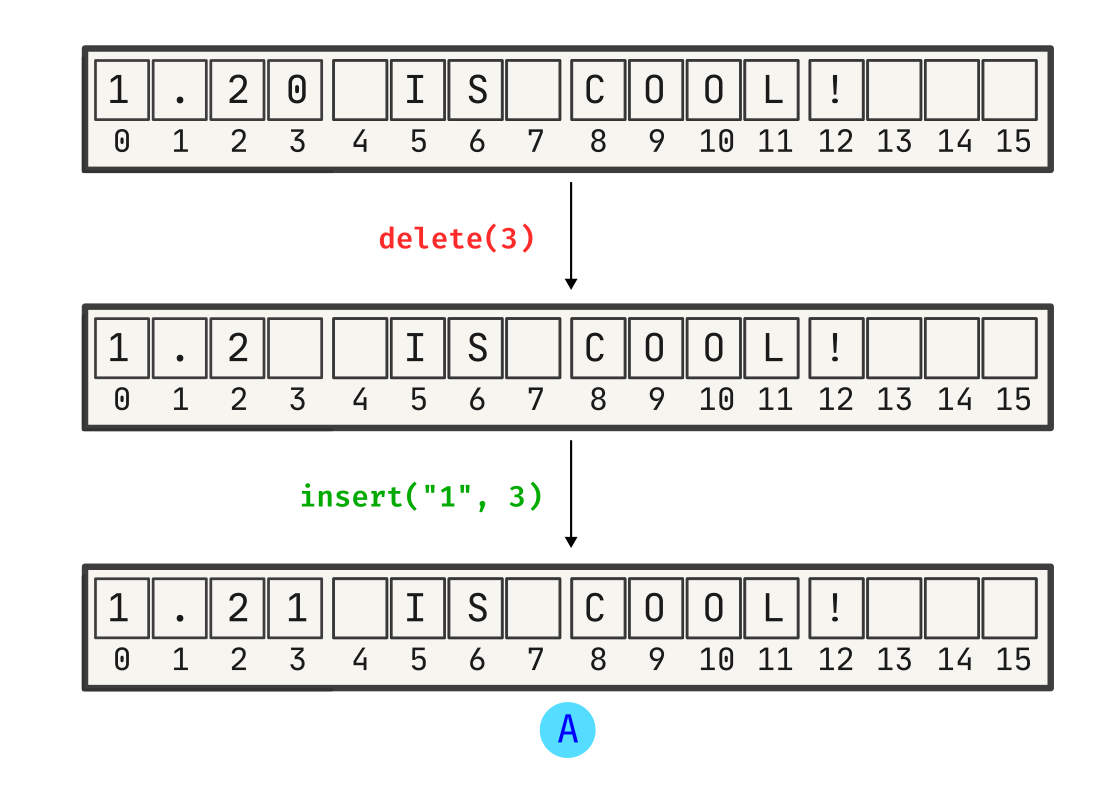
Now, user B tries to add “Go” to the sentence, as the discussion between A and B is related to the Go 1.21 release; and these changes are applied locally:
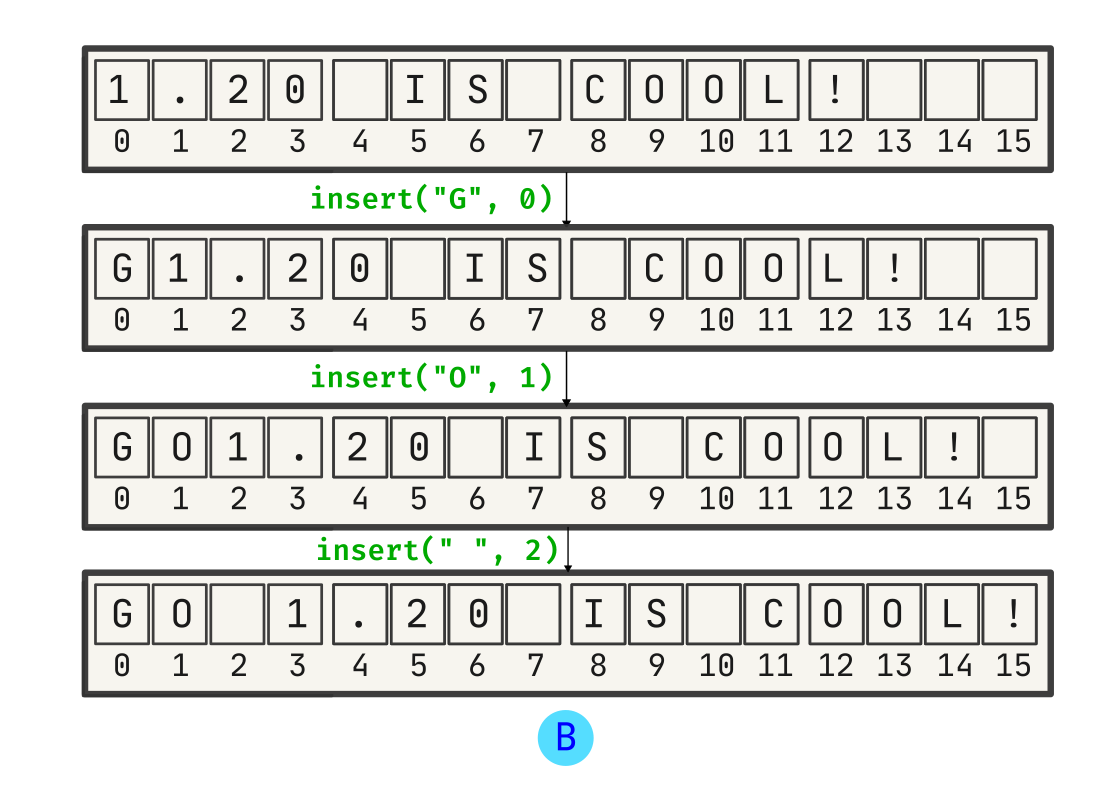
Now, the first operation which A made is received by B, and is applied on its local state:
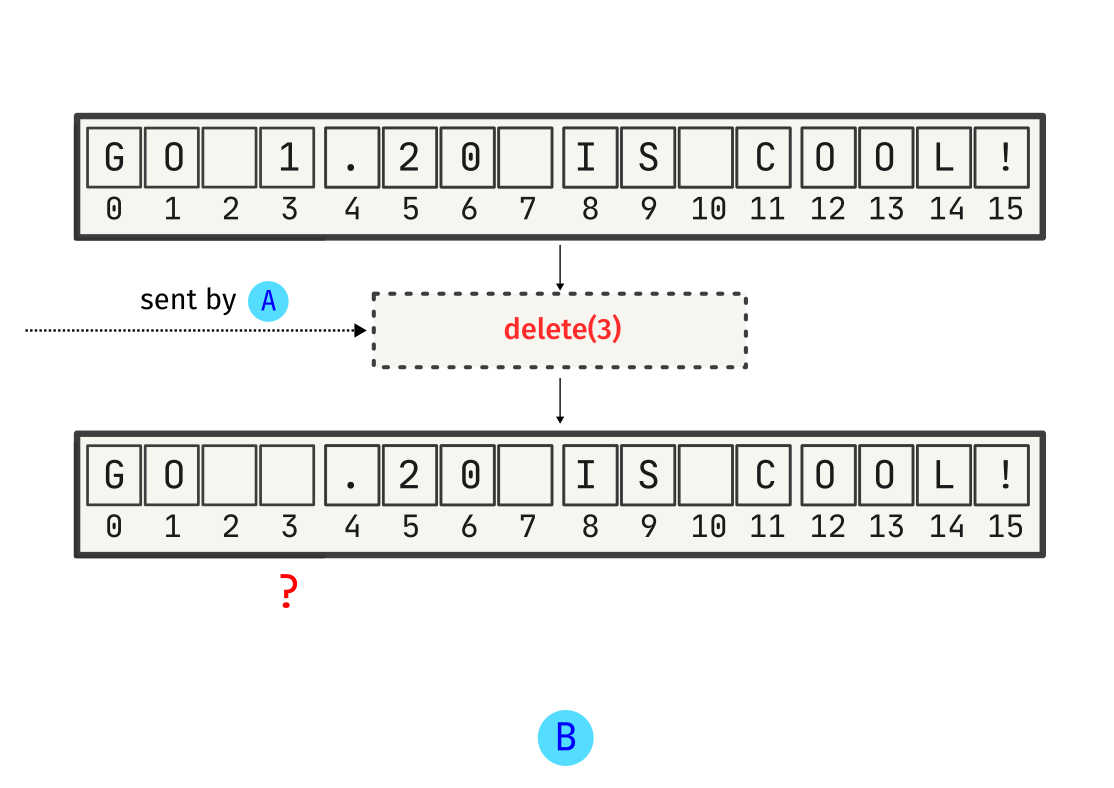
However, as shown above, this change is not intended. A just wanted to change the Go version number, that’s it. This is why we need a synchronization algorithm - it would help A and B to communicate effectively while preserving intent.
Let’s see what happens if we use something like OT (Operational Transformation). We’ll emulate the same operation:
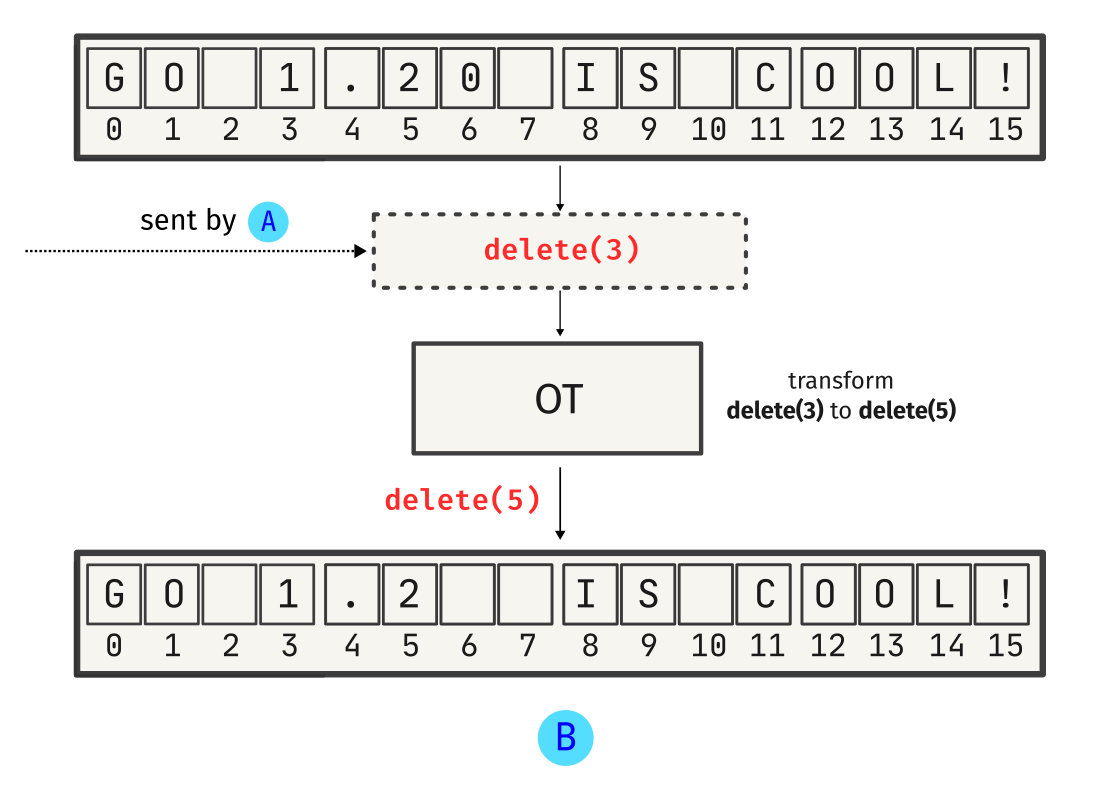
See? OT tries to preserve intent by transforming operations - in this case, delete(3) is transformed to delete(5) based on B’s local state. This ensures that the change is applied at the correct place. Similarly, A’s insert operation is transformed:
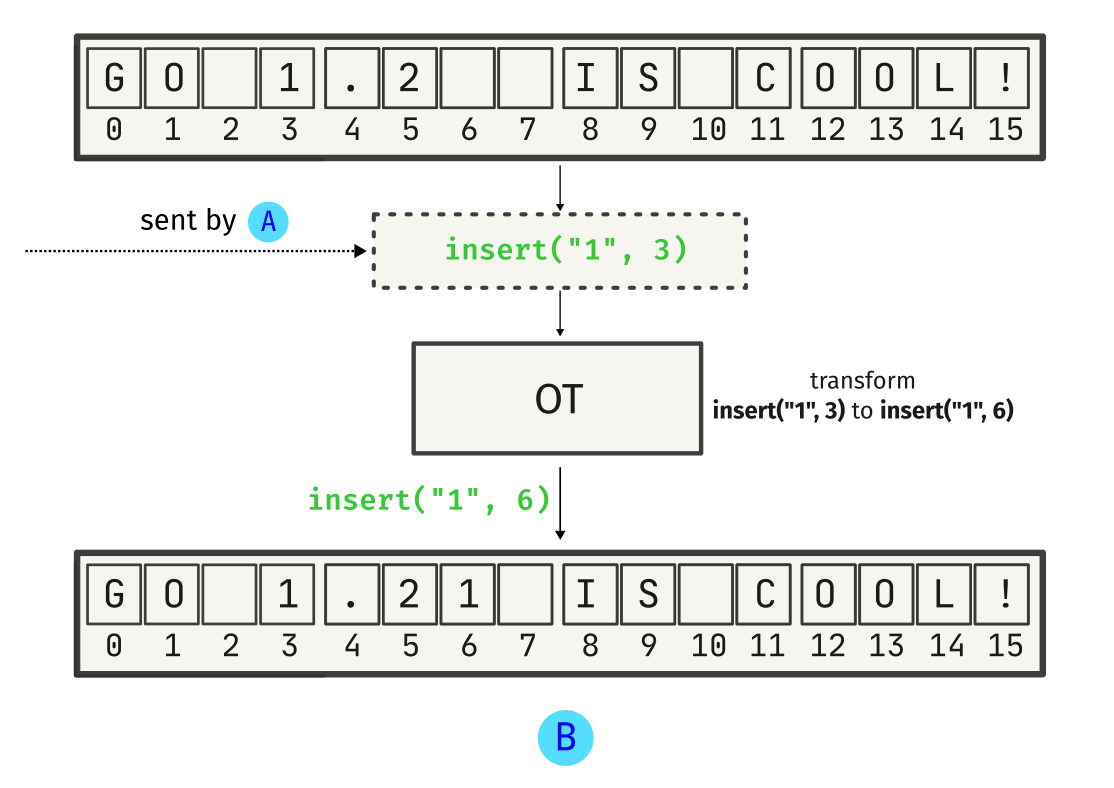
And this is it - A and B can now communicate effectively!
There are multiple consistency models for OT algorithms, but I want to keep this short - I’ll focus on the CCI model. The CCI model revolves around these three properties:
- Convergence: Eventually all documents in the system will be in the same state. Documents diverge when a client makes an edit to a document. For an OT algorithm to be correct, the algorithm must ensure that all documents in the system eventually converge on the same state.
- Causality preservation: For any two operations, namely
o1ando2, whereo1 → o2, the order of execution of both operations across all clients must strictly follow the ordero1beforeo2. - Intention Preservation: The impact of any operation
omust consistently reflect the intended effect as envisioned by the operation’s creator across all clients.
There are a bunch of other concepts (for example, forward and backward transformation) which aren’t covered here, but I would highly advise to refer the Wikipedia page for Operational Transformation if you’re more curious.
OTs are cool, but what about CRDTs? Are they any better?
Well.. let’s find out!
CRDTs
A Conflict-free Replicated Data Type (CRDT) is an abstract data structure with a well-defined interface. Its purpose is to be duplicated across multiple nodes, demonstrating the following key characteristics:
- Modifications can be made to any replica independently, without the need for coordination with other replicas.
- When two replicas have received the same set of updates, they ensure convergence to an identical state through well-defined mathematical principles, ensuring consistent results.
CRDTs are crafted for replication across distributed systems, prioritizing eventual consistency.
To summarize, CRDTs enable updates to be applied without resource-intensive synchronization or consensus mechanisms.
And the best part? They are eventually consistent. Pretty neat, huh?
CRDTs can be categorized into two general types based on the model of replication: state-based and operation-based.
State-based CRDTs
State-based CRDTs, also known as convergent replicated data types (CvRDTs), work by sending its full state over the wire. On receiving the state from a different replica, the local node merges the received state with the local state.
The main issue with state-based CRDTs is that its performance depends on the size of the data (state). If the data transmitted over the wire is big, state-based CRDTs may be inefficient.
Operation-based CRDTs
Operation-based CRDTs, also known as commutative replicated data types (CmRDTs), work by sending individual operations over the wire.
In order for all replicas to converge to the same state, all the operations are required to be commutative when applied to the local state.
The main benefit of operation-based CRDTs is the minimal amount of data sent over the network as compared to state-based CRDTs.
OT vs CRDTs
So, you might be wondering - what’s the real difference?
To summarize: Operational transformation (OT) works by changing operations. CRDTs work by changing state.
| OT (Operational Transformation) | CRDTs (Conflict-free Replicated Data Types) |
|---|---|
| Relies on conflict resolution mechanisms | Handles conflicts by design |
| Requires a centralized server or coordination for conflict resolution | Conflict resolution is automatic and decentralized |
| Can be complex to implement | Simpler to implement |
| Convergence time can be longer | Achieves rapid convergence |
Phew! I’ve covered quite a bit of theory, and I’d like to avoid making this longer and potentially tedious for you. Let’s dive into the actual implementation of the editor!
Building pairpad
To simplify the process of building a collaborative editor, I devised a plan to start with a basic architecture and gradually add more features while keeping the core elements straightforward.
For pairpad, the MVP needed to have:
- a good interface for interactions
- a smooth collaborative editing experience
- the easiest deployment experience
- an instant way to connect to a session
Having established these primary requirements, the next step was identifying the core components of the collaborative editor. For a collaborative editor, the components would be:
- A client (for interaction)
- An event handler (which would respond to user input and perform actions)
- A conflict resolution mechanism (OT/CRDTs)
- A broadcaster (which would broadcast operations to other clients)
- anything else..
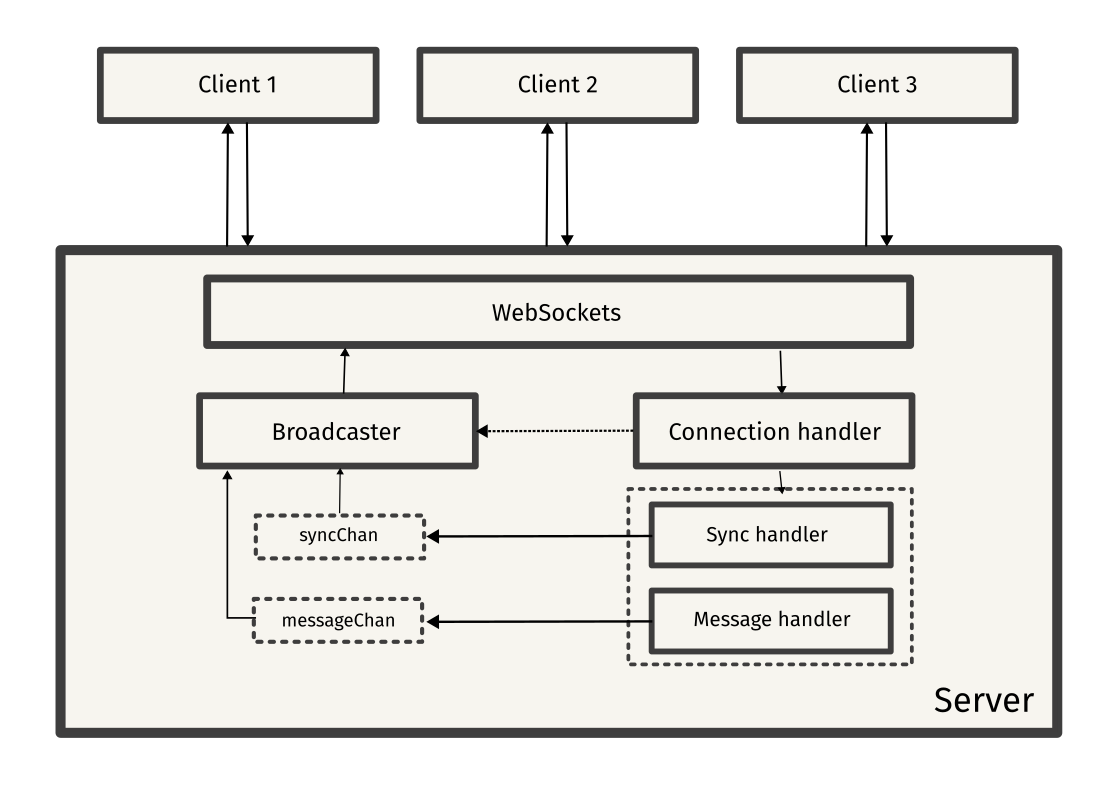
By using these components as building blocks, I came up with this architecture for pairpad:
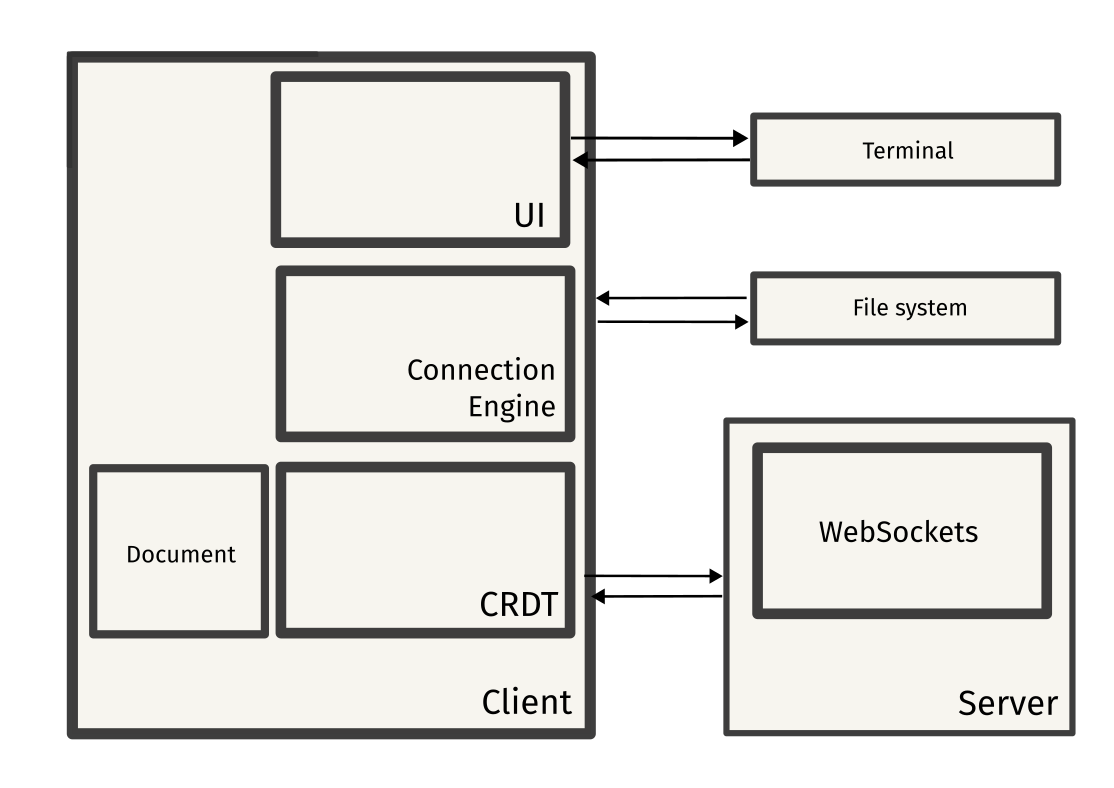
I’ll also attach the original architecture diagram:
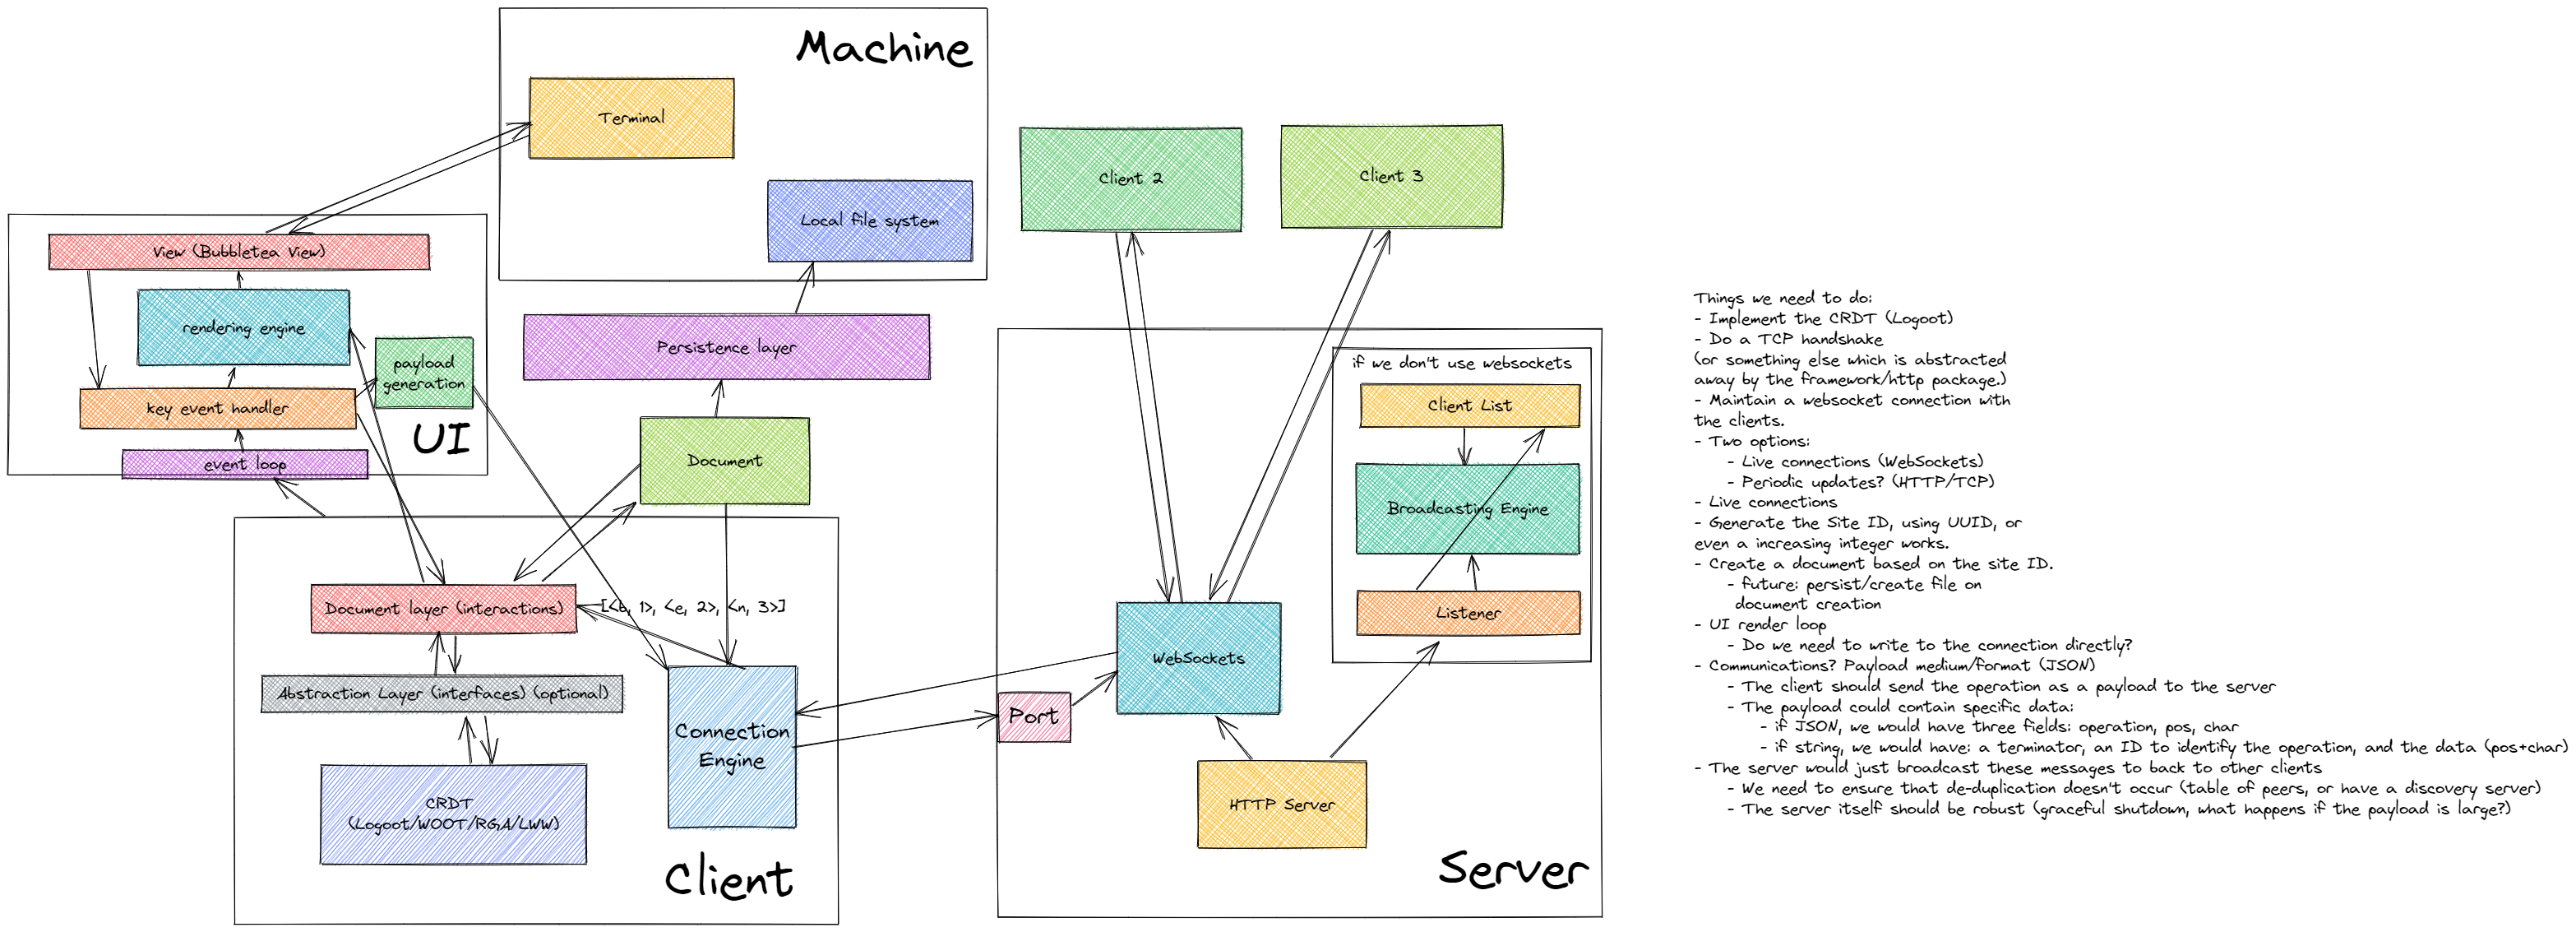
The diagram doesn’t explain much; let me explain each flow in depth:
User interface
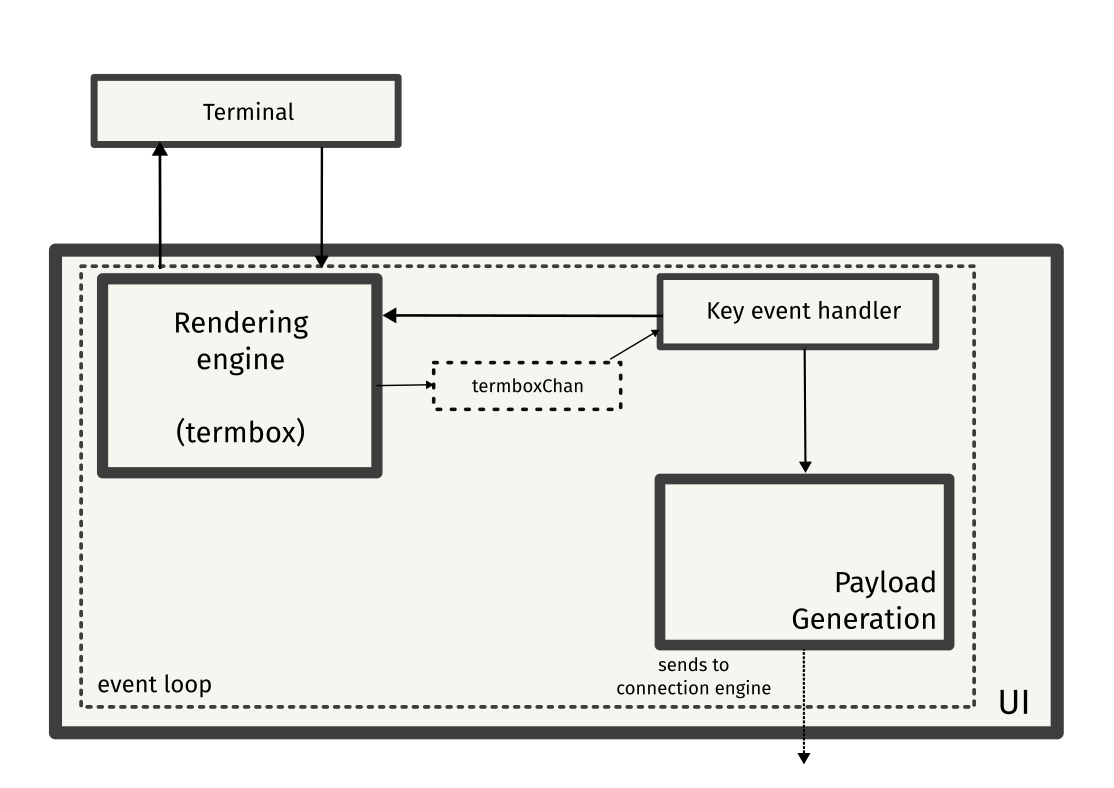
The user interface is a text-based user interface (TUI) built using the Go port of termbox, a minimal alternative to ncurses.
Each keystroke is consumed by termbox and is registered as a termbox event. This event is sent to a channel called termboxChan.
This channel is the main “pipeline” of any UI-related events. All events from this channel are consumed by the “key event handler”, which processes the event and performs operations based on the key. Operations include cursor movements, performing editor operations and payload generation, which includes the generation of a JSON payload, which is sent to the client’s connection engine.
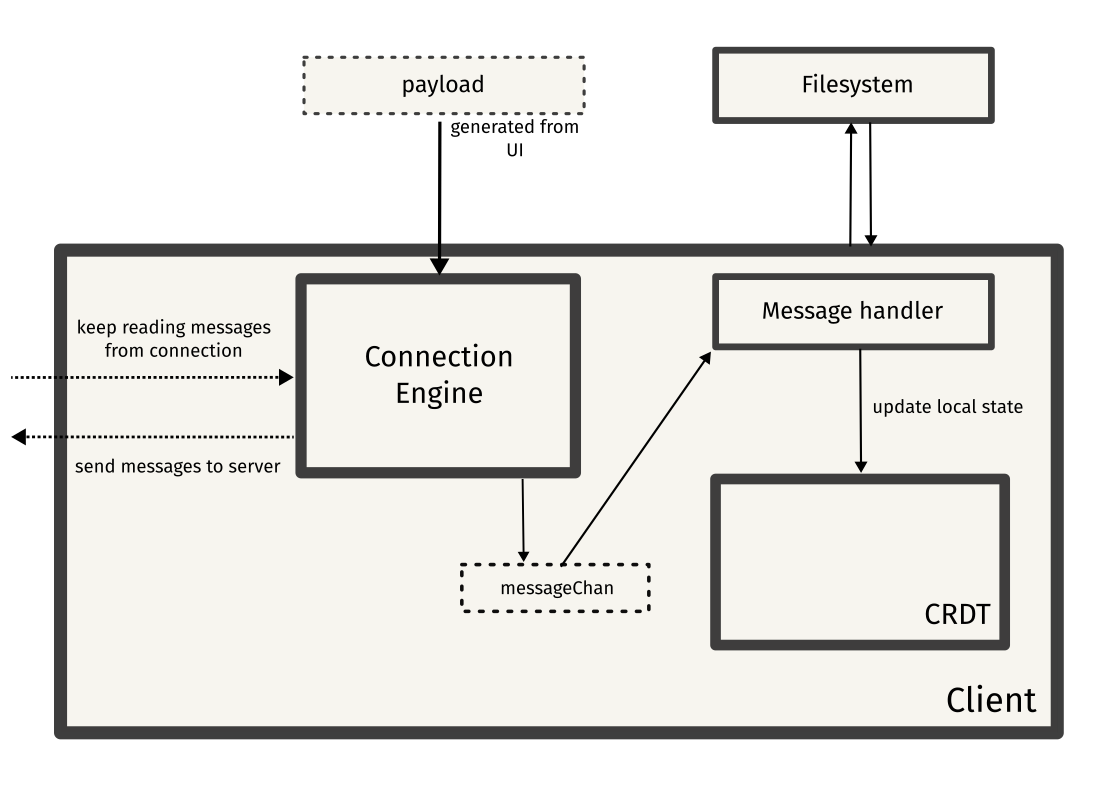
Client
The payload sent from the event handler is now parsed by the connection engine, the component which is responsible for communicating with the server. A goroutine keeps listening for any messages from the WebSocket connection, and sends the message to the message channel (messageChan).
These messages are parsed by the message handler, which checks the message type and performs a suitable action on the local document (CRDT). This will be discussed in detail later.
Server
Finally, the server is just a hub that broadcasts messages to all connected clients. All clients connect to the server using WebSockets, and the server maintains a list of all connected clients.
The server broadcasts all operations sent by a client to all connected clients. It also helps in managing a document synchronization request, wherein a client asks for the current copy of the editing session in order to be in sync with other clients.
Let me also address some potential questions that may arise in your mind:
Q: Why did you choose CRDTs over OT?
Pretty simple - I always wanted to tinker around with CRDTs, and OT seemed pretty complicated at the first glance. Since this was a toy project and not a commercial project, I decided to go with the approach that seemed simpler to me, and CRDTs were magical to me - the idea of handling conflicts by design rather than resolution seemed fascinating to me.
Q: Why did you choose a client-server architecture over a P2P architecture?
A: I wanted the user flow to be really simple: all clients should be able to connect to a central server, and users can maintain their own server if needed. I wanted to keep the amount of maintainance and work needed to set up a session to be minimal. And for keeping it more accessible for users who are less experienced with server maintainance, this decision was made. I’m not saying that setting up P2P apps is hard, but when you develop software, you need to ensure that it’s accessible for everyone.
Setting up the user interface
It was time to pick a library for building the TUI (user interface). I had three options:
bubbleteaand the charm.sh ecosystemtermboxtcell
The charm.sh ecosystem is a no-brainer if you want to build beautiful applications for the terminal.
I played around with bubbletea, but it hit me that whipping up the TUI I wanted might be trickier than I thought. The fine-grained control (over cursor positions, individual cells, etc.) was not quite there. And even if there was a workaround, keeping up with how to pull it off started feeling like a bit of a struggle, to be honest.
I did ask the team about this, and here was the response from the awesome @muesli:

I tried my best, but there was definitely something I was lacking during the implementation – it felt like quite the challenge.
If any
bubbleteaenthusiast could help in porting the current TUI fromtermboxtobubbleteathrough some tips or code contributions, I’d be happy to listen!
As I didn’t want this to be a blocker, so I scrapped the prototype and moved on to the next option: termbox - a classic solution.
termbox uses a two-dimensional cell buffer to represent the terminal screen, with a few methods like setting cells, clearing the screen, or setting the cursor. All input (including keyboard, mouse, or resize events) is tracked through a unified Event type.
This is exactly what I needed, and it makes a great fit for applications like text editors. The biggest advantage of using termbox was the ability to utilize methods for low-level functionality too. (setting cells/cursors, etc.)
The editor UI is structured in this way:
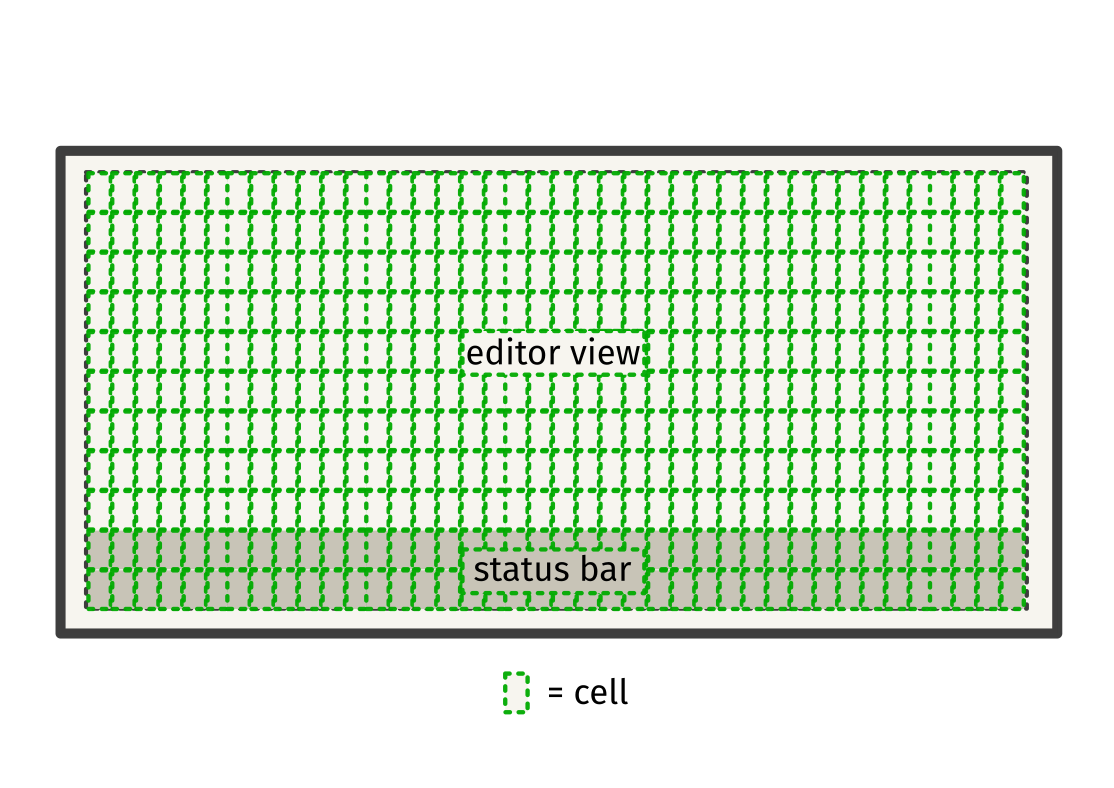
The UI is pretty simplistic, with only two components:
- Core Editing View
- Status bar
The core editing view is where the actual text editing happens. Users can type, delete, move the cursor, select text, etc. in this view. How this works is by maintaining a buffer of cells representing the terminal screen. Each cell contains either a character or a style (like bold, underline, etc.). On modification, the buffer is updated and redrawn on the screen.
The status bar is a component made using the termbox buffer which acts as a place for displaying information like cursor position, info/error messages, etc. It is updated whenever there are relevant changes in the core editing view, or when there are events like user joining/leaving a session, etc.
And here is the editor implementation using termbox-go (pure Go implementation of termbox):
package editor

import (
	"fmt"
	"sync"

	"github.com/mattn/go-runewidth"
	"github.com/nsf/termbox-go"
)

type EditorConfig struct {
	ScrollEnabled bool
}

// Editor represents the editor's skeleton.
// The editor is composed of two components:
// 1. an editable text area; which acts as the primary interactive area.
// 2. a status bar; which displays messages on different events, for example, when an user joins a session, etc.
type Editor struct {
	// Text contains the editor's content.
	Text []rune

	// Cursor represents the cursor position of the editor.
	Cursor int

	// Width represents the terminal's width in characters.
	Width int

	// Height represents the terminal's width in characters.
	Height int

	// ColOff is the number of columns between the start of a line and the left of the editor window
	ColOff int

	// RowOff is the number of rows between the beginning of the text and the top of the editor window
	RowOff int

	// ShowMsg acts like a switch for the status bar.
	ShowMsg bool

	// StatusMsg holds the text to be displayed in the status bar.
	StatusMsg string

	// StatusChan is used to send and receive status messages.
	StatusChan chan string

	// StatusMu protects against concurrent reads and writes to status bar info.
	StatusMu sync.Mutex

	// Users holds the names of all users connected to the server, displayed in the status bar.
	Users []string

	// ScrollEnabled determines whether or not the user can scroll past the initial editor
	// window. It is set by the EditorConfig.
	ScrollEnabled bool

	// IsConnected shows whether the editor is currently connected to the server.
	IsConnected bool

	// DrawChan is used to send and receive signals to update the terminal display.
	DrawChan chan int

	// mu prevents concurrent reads and writes to the editor state.
	mu sync.RWMutex
}

var userColors = []termbox.Attribute{
	termbox.ColorGreen,
	termbox.ColorYellow,
	termbox.ColorBlue,
	termbox.ColorMagenta,
	termbox.ColorCyan,
	termbox.ColorLightYellow,
	termbox.ColorLightMagenta,
	termbox.ColorLightGreen,
	termbox.ColorLightRed,
	termbox.ColorRed,
}

// NewEditor returns a new instance of the editor.
func NewEditor(conf EditorConfig) *Editor {
	return &Editor{
		ScrollEnabled: conf.ScrollEnabled,
		StatusChan:    make(chan string, 100),
		DrawChan:      make(chan int, 10000),
	}
}

// GetText returns the editor's content.
func (e *Editor) GetText() []rune {
	e.mu.RLock()
	defer e.mu.RUnlock()
	return e.Text
}

// SetText sets the given string as the editor's content.
func (e *Editor) SetText(text string) {
	e.mu.Lock()
	e.Text = []rune(text)
	e.mu.Unlock()
}

// GetX returns the X-axis component of the current cursor position.
func (e *Editor) GetX() int {
	x, _ := e.calcXY(e.Cursor)
	return x
}

// SetX sets the X-axis component of the current cursor position to the specified X position.
func (e *Editor) SetX(x int) {
	e.Cursor = x
}

// GetY returns the Y-axis component of the current cursor position.
func (e *Editor) GetY() int {
	_, y := e.calcXY(e.Cursor)
	return y
}

....

// MoveCursor updates the cursor position horizontally by a given x increment, and
// vertically by one line in the direction indicated by y. The positive directions are
// right and down, respectively.
// This is used by the UI layer, where it updates the cursor position on keypresses.
func (e *Editor) MoveCursor(x, y int) {
	if len(e.Text) == 0 && e.Cursor == 0 {
		return
	}
	// Move cursor horizontally.
	newCursor := e.Cursor + x

	// Move cursor vertically.
	if y > 0 {
		newCursor = e.calcCursorDown()
	}

	if y < 0 {
		newCursor = e.calcCursorUp()
	}

	if e.ScrollEnabled {
		cx, cy := e.calcXY(newCursor)

		// move the window to adjust for the cursor
		rowStart := e.GetRowOff()
		rowEnd := e.GetRowOff() + e.GetHeight() - 1

		if cy <= rowStart { // scroll up
			e.IncRowOff(cy - rowStart - 1)
		}

		if cy > rowEnd { // scroll down
			e.IncRowOff(cy - rowEnd)
		}

		colStart := e.GetColOff()
		colEnd := e.GetColOff() + e.GetWidth()

		if cx <= colStart { // scroll left
			e.IncColOff(cx - (colStart + 1))
		}

		if cx > colEnd { // scroll right
			e.IncColOff(cx - colEnd)
		}
	}

	// Reset to bounds.
	if newCursor > len(e.Text) {
		newCursor = len(e.Text)
	}

	if newCursor < 0 {
		newCursor = 0
	}
	e.mu.Lock()
	e.Cursor = newCursor
	e.mu.Unlock()
}
Implementing the CRDT
With the UI in place, it was time to find a suitable CRDT. Following a thorough exploration of the CRDT landscape, I opted for WOOT. WOOT is simple enough and works well for collaborative text editing. Other potential options included Logoot, etc. but WOOT seemed the best fit considering that I wanted to get a basic implementation up and running quickly.
WOOT
WOOT is a simple sequence CRDT. In WOOT, each character is represented as a W-character which is a tuple consisting of five fields:
< id, visible, value, idcp, idcn >
where:
idis the identifier of the character (site id, unique natural number).visible, a boolean value that indicates if the character is visible.valueis the alphabetical value of the character.idcpis the identifier of the previous W-character of c.idcnis the identifier of the next W-character of c.
Each site has an unique identifier s, a logical clock, and a sequence of W-characters. The site identifier and the local clock are used for constructing the unique identifier for the characters.
Each time a W-character is generated on site s, the local clock is incremented. This is how the uniqueness of the character identifiers is ensured.
Local insertions are pretty straightforward - a new W-character is created with idcp and idcn pointing towards the previous and the next character.
Integrating insertions from other sites is a bit complicated - WOOT will take a subsequence of the characters between idcp and idcn, if the subsequence is empty, it can be inserted here. Else, it will try to find a suitable position and make a recursive call to itself with those positions.
And for deletions, instead of directly removing characters, WOOT marks the character as deleted by setting the visible boolean to false.
To start off, let’s implement an interface for abstracting away the underlying CRDT. This would ensure that we can keep the CRDT layer separate from the CRDT itself.
type CRDT interface {
	Insert(position int, value string) (string, error)
	Delete(position int) string
}
For implementing WOOT, I started porting psuedocode from the paper to actual Go code. I took some references from various JavaScript/TypeScript implementations while writing this. If you want to read more about WOOT, you can read the research paper here.
Here is the complete implementation of WOOT:
// LocalInsert inserts the character into the document.
func (doc *Document) LocalInsert(char Character, position int) (*Document, error) {
	if position <= 0 || position >= doc.Length() {
		return doc, ErrPositionOutOfBounds
	}

	if char.ID == "" {
		return doc, ErrEmptyWCharacter
	}

	doc.Characters = append(doc.Characters[:position],
		append([]Character{char}, doc.Characters[position:]...)...,
	)

	// Update next and previous pointers.
	doc.Characters[position-1].IDNext = char.ID
	doc.Characters[position+1].IDPrevious = char.ID

	return doc, nil
}

// IntegrateInsert inserts the given Character into the Document
// Characters based off of the previous & next Character
func (doc *Document) IntegrateInsert(char, charPrev, charNext Character) (*Document, error) {
	// Get the subsequence.
	subsequence, err := doc.Subseq(charPrev, charNext)
	if err != nil {
		return doc, err
	}

	// Get the position of the next character.
	position := doc.Position(charNext.ID)
	position--

	// If no characters are present in the subsequence, insert at current position.
	if len(subsequence) == 0 {
		return doc.LocalInsert(char, position)
	}

	// If one character is present in the subsequence, insert at previous position.
	if len(subsequence) == 1 {
		return doc.LocalInsert(char, position-1)
	}

	// Find the appropriate position for the new character in the subsequence.
    i := 1
    for i < len(subsequence)-1 && subsequence[i].ID < char.ID {
        i++
    }

    // Make a recursive call with the correct positions.
    return doc.IntegrateInsert(char, subsequence[i-1], subsequence[i])
}

// GenerateInsert generates a character for a given value.
func (doc *Document) GenerateInsert(position int, value string) (*Document, error) {
	// Increment local clock.
	mu.Lock()
	LocalClock++
	mu.Unlock()

	// Get previous and next characters.
	charPrev := IthVisible(*doc, position-1)
	charNext := IthVisible(*doc, position)

	// Use defaults.
	if charPrev.ID == "-1" {
		charPrev = doc.Find("start")
	}
	if charNext.ID == "-1" {
		charNext = doc.Find("end")
	}

	char := Character{
		ID:         fmt.Sprint(SiteID) + fmt.Sprint(LocalClock),
		Visible:    true,
		Value:      value,
		IDPrevious: charPrev.ID,
		IDNext:     charNext.ID,
	}

	return doc.IntegrateInsert(char, charPrev, charNext)
}

// IntegrateDelete finds a character and marks it for deletion.
func (doc *Document) IntegrateDelete(char Character) *Document {
	position := doc.Position(char.ID)
	if position == -1 {
		return doc
	}

	// This is how deletion is done.
	doc.Characters[position-1].Visible = false

	return doc
}

// GenerateDelete generates the character which is to be marked for deletion.
func (doc *Document) GenerateDelete(position int) *Document {
	char := IthVisible(*doc, position)
	return doc.IntegrateDelete(char)
}
Now, WOOT needs to implement the CRDT interface - pretty straightforward:
func (doc *Document) Insert(position int, value string) (string, error) {
	newDoc, err := doc.GenerateInsert(position, value)
	if err != nil {
		return Content(*doc), err
	}

	return Content(*newDoc), nil
}

func (doc *Document) Delete(position int) string {
	newDoc := doc.GenerateDelete(position)
	return Content(*newDoc)
}
Building the client
With the editor implementation in place, the next step is to set up the TUI and the event handler.
The event handler is simple: for each termbox event, we need to perform some action. In our case, we have multiple event-action mappings:
- On
Esc, the editor should exit - On
Ctrl+S, the document should be persisted to a local file - On
Ctrl+L, the document should load the file - etc.
Here is the code for the termbox event handler:
func handleTermboxEvent(ev termbox.Event, conn *websocket.Conn) error {
	// We only want to deal with termbox key events (EventKey).
	if ev.Type == termbox.EventKey {
		switch ev.Key {

		// The default keys for exiting an session are Esc and Ctrl+C.
		case termbox.KeyEsc, termbox.KeyCtrlC:
			// Return an error with the prefix "pairpad", so that it gets treated as an exit "event".
			return errors.New("pairpad: exiting")

		// The default key for saving the editor's contents is Ctrl+S.
		case termbox.KeyCtrlS:
			// If no file name is specified, set filename to "pairpad-content.txt"
			if fileName == "" {
				fileName = "pairpad-content.txt"
			}

			// Save the CRDT to a file.
			err := crdt.Save(fileName, &doc)
			if err != nil {
				logrus.Errorf("Failed to save to %s", fileName)
				e.StatusChan <- fmt.Sprintf("Failed to save to %s", fileName)
				return err
			}

			// Set the status bar.
			e.StatusChan <- fmt.Sprintf("Saved document to %s", fileName)

		// The default key for loading content from a file is Ctrl+L.
		case termbox.KeyCtrlL:
			if fileName != "" {
				logger.Log(logrus.InfoLevel, "LOADING DOCUMENT")
				newDoc, err := crdt.Load(fileName)
				if err != nil {
					logrus.Errorf("failed to load file %s", fileName)
					e.StatusChan <- fmt.Sprintf("Failed to load %s", fileName)
					return err
				}
				e.StatusChan <- fmt.Sprintf("Loading %s", fileName)
				doc = newDoc
				e.SetX(0)
				e.SetText(crdt.Content(doc))

				logger.Log(logrus.InfoLevel, "SENDING DOCUMENT")
				docMsg := commons.Message{Type: commons.DocSyncMessage, Document: doc}
				_ = conn.WriteJSON(&docMsg)
			} else {
				e.StatusChan <- "No file to load!"
			}

		// The default keys for moving left inside the text area are the left arrow key, and Ctrl+B (move backward).
		case termbox.KeyArrowLeft, termbox.KeyCtrlB:
			e.MoveCursor(-1, 0)

		// The default keys for moving right inside the text area are the right arrow key, and Ctrl+F (move forward).
		case termbox.KeyArrowRight, termbox.KeyCtrlF:
			e.MoveCursor(1, 0)

		// The default keys for moving up inside the text area are the up arrow key, and Ctrl+P (move to previous line).
		case termbox.KeyArrowUp, termbox.KeyCtrlP:
			e.MoveCursor(0, -1)

		// The default keys for moving down inside the text area are the down arrow key, and Ctrl+N (move to next line).
		case termbox.KeyArrowDown, termbox.KeyCtrlN:
			e.MoveCursor(0, 1)

		// Home key, moves cursor to initial position (X=0).
		case termbox.KeyHome:
			e.SetX(0)

		// End key, moves cursor to final position (X= length of text).
		case termbox.KeyEnd:
			e.SetX(len(e.Text))

		// The default keys for deleting a character are Backspace and Delete.
		case termbox.KeyBackspace, termbox.KeyBackspace2:
			performOperation(OperationDelete, ev, conn)
		case termbox.KeyDelete:
			performOperation(OperationDelete, ev, conn)

		// The Tab key inserts 4 spaces to simulate a "tab".
		case termbox.KeyTab:
			for i := 0; i < 4; i++ {
				ev.Ch = ' '
				performOperation(OperationInsert, ev, conn)
			}

		// The Enter key inserts a newline character to the editor's content.
		case termbox.KeyEnter:
			ev.Ch = '\n'
			performOperation(OperationInsert, ev, conn)

		// The Space key inserts a space character to the editor's content.
		case termbox.KeySpace:
			ev.Ch = ' '
			performOperation(OperationInsert, ev, conn)

		// Every other key is eligible to be a candidate for insertion.
		default:
			if ev.Ch != 0 {
				performOperation(OperationInsert, ev, conn)
			}
		}
	}

	e.SendDraw()
	return nil
}
performOperation is used for performing operations on the CRDT (local document), and it sends a payload over the WebSocket connection.
const (
	OperationInsert = iota
	OperationDelete
)

// performOperation performs a CRDT insert or delete operation on the local document and sends a message over the WebSocket connection.
func performOperation(opType int, ev termbox.Event, conn *websocket.Conn) {
	// Get position and value.
	ch := string(ev.Ch)

	var msg commons.Message

	// Modify local state (CRDT) first.
	switch opType {
	case OperationInsert:
		logger.Infof("LOCAL INSERT: %s at cursor position %v\n", ch, e.Cursor)

		text, err := doc.Insert(e.Cursor+1, ch)
		if err != nil {
			e.SetText(text)
			logger.Errorf("CRDT error: %v\n", err)
		}
		e.SetText(text)

		e.MoveCursor(1, 0)
		msg = commons.Message{Type: "operation", Operation: commons.Operation{Type: "insert", Position: e.Cursor, Value: ch}}

	case OperationDelete:
		logger.Infof("LOCAL DELETE: cursor position %v\n", e.Cursor)

		if e.Cursor-1 < 0 {
			e.Cursor = 0
		}

		text := doc.Delete(e.Cursor)
		e.SetText(text)

		msg = commons.Message{Type: "operation", Operation: commons.Operation{Type: "delete", Position: e.Cursor}}
		e.MoveCursor(-1, 0)
	}

	// Send the message.
	if e.IsConnected {
		err := conn.WriteJSON(msg)
		if err != nil {
			e.IsConnected = false
			e.StatusChan <- "lost connection!"
		}
	}
}
How do the other clients handle the received payload? Here’s an insight into the client’s internal process:
handleMsgreceives the message from a top-level component (I’ll talk about this later)- it checks the message type;
pairpadhas multiple message types: one for operations, one for info messages, etc. - it performs an action based on the message type
You might be seeing DocSync, DocReq and a bunch of other types here. Those are for document synchronization, I’ll discuss that later.
Here is the code for handling a message:
// handleMsg updates the CRDT document with the contents of the message.
func handleMsg(msg commons.Message, conn *websocket.Conn) {
	switch msg.Type {
	case commons.DocSyncMessage:
		logger.Infof("DOCSYNC RECEIVED, updating local doc %+v\n", msg.Document)

		doc = msg.Document
		e.SetText(crdt.Content(doc))

	case commons.DocReqMessage:
		logger.Infof("DOCREQ RECEIVED, sending local document to %v\n", msg.ID)

		docMsg := commons.Message{Type: commons.DocSyncMessage, Document: doc, ID: msg.ID}
		_ = conn.WriteJSON(&docMsg)

	case commons.SiteIDMessage:
		siteID, err := strconv.Atoi(msg.Text)
		if err != nil {
			logger.Errorf("failed to set siteID, err: %v\n", err)
		}

		crdt.SiteID = siteID
		logger.Infof("SITE ID %v, INTENDED SITE ID: %v", crdt.SiteID, siteID)

	case commons.JoinMessage:
		e.StatusChan <- fmt.Sprintf("%s has joined the session!", msg.Username)

	case commons.UsersMessage:
		e.StatusMu.Lock()
		e.Users = strings.Split(msg.Text, ",")
		e.StatusMu.Unlock()

	default:
		switch msg.Operation.Type {
		case "insert":
			_, err := doc.Insert(msg.Operation.Position, msg.Operation.Value)
			if err != nil {
				logger.Errorf("failed to insert, err: %v\n", err)
			}

			e.SetText(crdt.Content(doc))
			if msg.Operation.Position-1 <= e.Cursor {
				e.MoveCursor(len(msg.Operation.Value), 0)
			}
			logger.Infof("REMOTE INSERT: %s at position %v\n", msg.Operation.Value, msg.Operation.Position)

		case "delete":
			_ = doc.Delete(msg.Operation.Position)
			e.SetText(crdt.Content(doc))
			if msg.Operation.Position-1 <= e.Cursor {
				e.MoveCursor(-len(msg.Operation.Value), 0)
			}
			logger.Infof("REMOTE DELETE: position %v\n", msg.Operation.Position)
		}
	}

	// printDoc is used for debugging purposes. Don't comment this out.
	// This can be toggled via the `-debug` flag.
	// The default behavior for printDoc is to NOT log anything.
	// This is to ensure that the debug logs don't take up much space on the user's filesystem, and can be toggled on demand.
	printDoc(doc)

	e.SendDraw()
}
You may have observed that communication takes place across several channels. Here’s a breakdown of the functions of these channels:
termboxChanis a channel meant for termbox events. A goroutine sends termbox events to the channel by using thePollEventmethod, which polls for events and returns a termbox event (termbox.Event).
// getTermboxChan returns a channel of termbox Events repeatedly waiting on user input.
func getTermboxChan() chan termbox.Event {
	termboxChan := make(chan termbox.Event)

	go func() {
		for {
			termboxChan <- termbox.PollEvent()
		}
	}()

	return termboxChan
}
messageChanis a channel meant for internal “messages”. A goroutine reads JSON from the connection, and sends the message to the message channel.
// getMsgChan returns a message channel that repeatedly reads from a websocket connection.
func getMsgChan(conn *websocket.Conn) chan commons.Message {
	messageChan := make(chan commons.Message)
	go func() {
		for {
			var msg commons.Message

			// Read message.
			err := conn.ReadJSON(&msg)
			if err != nil {
				if websocket.IsUnexpectedCloseError(err, websocket.CloseGoingAway, websocket.CloseAbnormalClosure) {
					logger.Errorf("websocket error: %v", err)
				}
				e.IsConnected = false
				e.StatusChan <- "lost connection!"
				break
			}

			logger.Infof("message received: %+v\n", msg)

			// send message through channel
			messageChan <- msg

		}
	}()
	return messageChan
}
With of all these communication mechanisms in place, it’s time to look at the main UI loop:
initUIstarts termbox and creates a new editor viewinitUIruns two goroutines:handleStatusMsgfor updating the status bardrawLoopfor updating the views
initUIcalls the main loopmainLoophas a never-endingforloop, which focuses on two things:- listen for a termbox Event from
termboxChan, and pass the event tohandleTermboxEvent - listen for a message from
msgChanand pass the message tohandleMsg
- listen for a termbox Event from
// initUI creates a new editor view and runs the main loop.
func initUI(conn *websocket.Conn, conf UIConfig) error {
	err := termbox.Init()
	if err != nil {
		return err
	}
	defer termbox.Close()

	e = editor.NewEditor(conf.EditorConfig)
	e.SetSize(termbox.Size())
	e.SetText(crdt.Content(doc))
	e.SendDraw()
	e.IsConnected = true

	go handleStatusMsg()

	go drawLoop()

	err = mainLoop(conn)
	if err != nil {
		return err
	}

	return nil
}

// mainLoop is the main update loop for the UI.
func mainLoop(conn *websocket.Conn) error {
	// termboxChan is used for sending and receiving termbox events.
	termboxChan := getTermboxChan()

	// msgChan is used for sending and receiving messages.
	msgChan := getMsgChan(conn)

	for {
		select {
		case termboxEvent := <-termboxChan:
			err := handleTermboxEvent(termboxEvent, conn)
			if err != nil {
				return err
			}
		case msg := <-msgChan:
			handleMsg(msg, conn)
		}
	}
}
Building the server
pairpad employs a simple mechanism for broadcasting. The idea is to use the server as a hub that broadcasts messages to all connected clients. All clients connect to the server using WebSockets, and the server maintains a list of all connected clients.
On each operation, the client sends a message to the server with the operation details. The server then broadcasts that message to all connected clients. Each client applies that operation to their local document, keeping all documents in sync.
Since sessions are long-lived, using WebSockets was a no-brainer over plain TCP or HTTP polling. WebSockets allow for bidirectional, full-duplex communication between clients and servers. This means that both the server and clients can push messages to each other at any time.
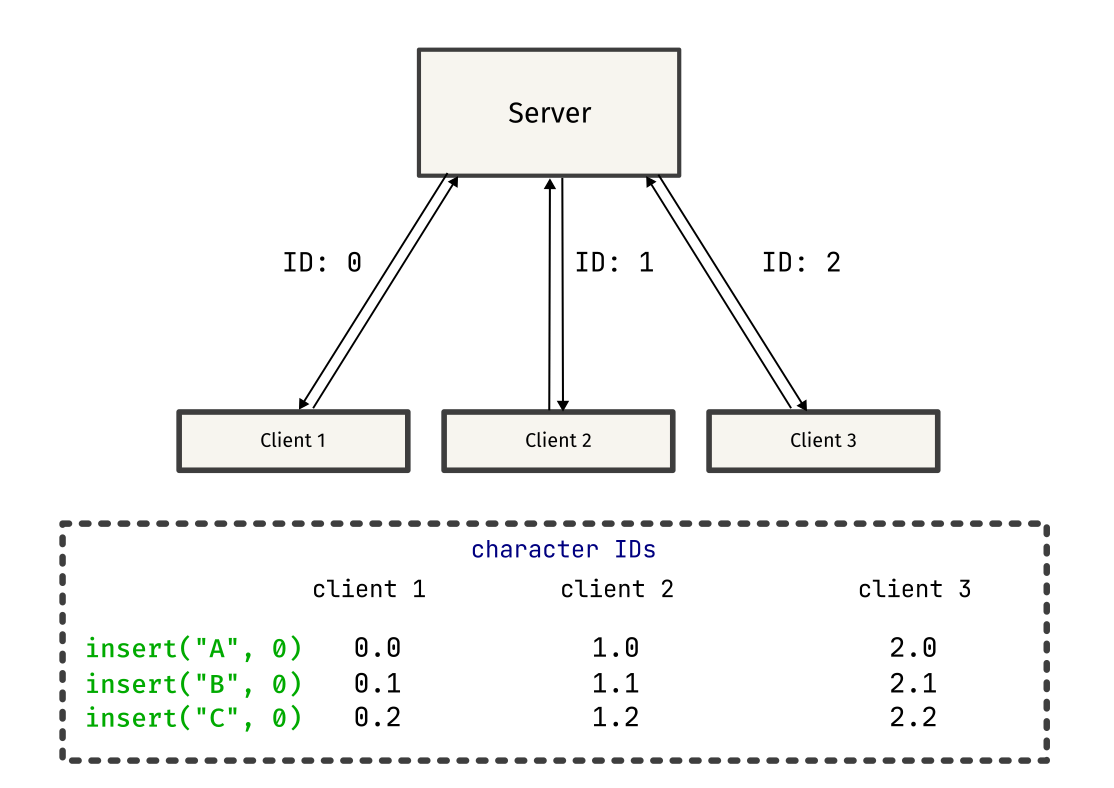
When a client connects to the server, we generate a site ID for that client and add that client to the list of connected clients. We send a site ID “message” to that client to let it know its ID. This site ID is used by the client for constructing the unique identifier for a character: <SiteID><LocalClock>. In the diagram, character ID is represented as <SiteID>.<LocalClock> for better readability.
func handleConn(w http.ResponseWriter, r *http.Request) {
	conn, err := upgrader.Upgrade(w, r, nil)
	if err != nil {
		color.Red("Error upgrading connection to websocket: %v\n", err)
		conn.Close()
		return
	}
	defer conn.Close()

	clientID := uuid.New()

	// Carefully increment and assign site ID with mutexes.
	mu.Lock()
	siteID++

	client := &client{
		Conn:    conn,
		SiteID:  strconv.Itoa(siteID),
		id:      clientID,
		writeMu: sync.Mutex{},
		mu:      sync.Mutex{},
	}
	mu.Unlock()

	clients.add(client)

	siteIDMsg := commons.Message{Type: commons.SiteIDMessage, Text: client.SiteID, ID: clientID}
	clients.broadcastOne(siteIDMsg, clientID)

	docReq := commons.Message{Type: commons.DocReqMessage, ID: clientID}
	clients.broadcastOneExcept(docReq, clientID)

	clients.sendUsernames()

	// Read messages from the connection and send to channel to broadcast
	for {
		var msg commons.Message
		if err := client.read(&msg); err != nil {
			color.Red("Failed to read message. closing client connection with %s. Error: %s", client.Username, err)
			return
		}

		// Send docSync to handleSync function. DocSync message IDs refer to
		// their destination. This channel send should happen before reassigning the
		// msg.ID
		if msg.Type == commons.DocSyncMessage {
			syncChan <- msg
			continue
		}

		// Set message ID as the ID of the sending client. Most message IDs refer to
		// their origin.
		msg.ID = clientID

		// Send message to messageChan for logging and broadcasting
		messageChan <- msg
	}
}
// handleMsg listens to the messageChan channel and broadcasts messages to other clients.
func handleMsg() {
	for {
		// Get message from messageChan.
		msg := <-messageChan

		// Log each message to stdout.
		t := time.Now().Format(time.ANSIC)
		if msg.Type == commons.JoinMessage {
			clients.updateName(msg.ID, msg.Username)
			color.Green("%s >> %s %s (ID: %s)\n", t, msg.Username, msg.Text, msg.ID)
			clients.sendUsernames()
		} else if msg.Type == "operation" {
			color.Green("operation >> %+v from ID=%s\n", msg.Operation, msg.ID)
		} else {
			color.Green("%s >> unknown message type:  %v\n", t, msg)
			clients.sendUsernames()
			continue
		}

		clients.broadcastAllExcept(msg, msg.ID)
	}
}

// handleSync reads from the syncChan and sends the message to the appropriate user(s).
func handleSync() {
	for {
		syncMsg := <-syncChan
		switch syncMsg.Type {
		case commons.DocSyncMessage:
			clients.broadcastOne(syncMsg, syncMsg.ID)
		case commons.UsersMessage:
			color.Blue("usernames: %s", syncMsg.Text)
			clients.broadcastAll(syncMsg)
		}
	}
}
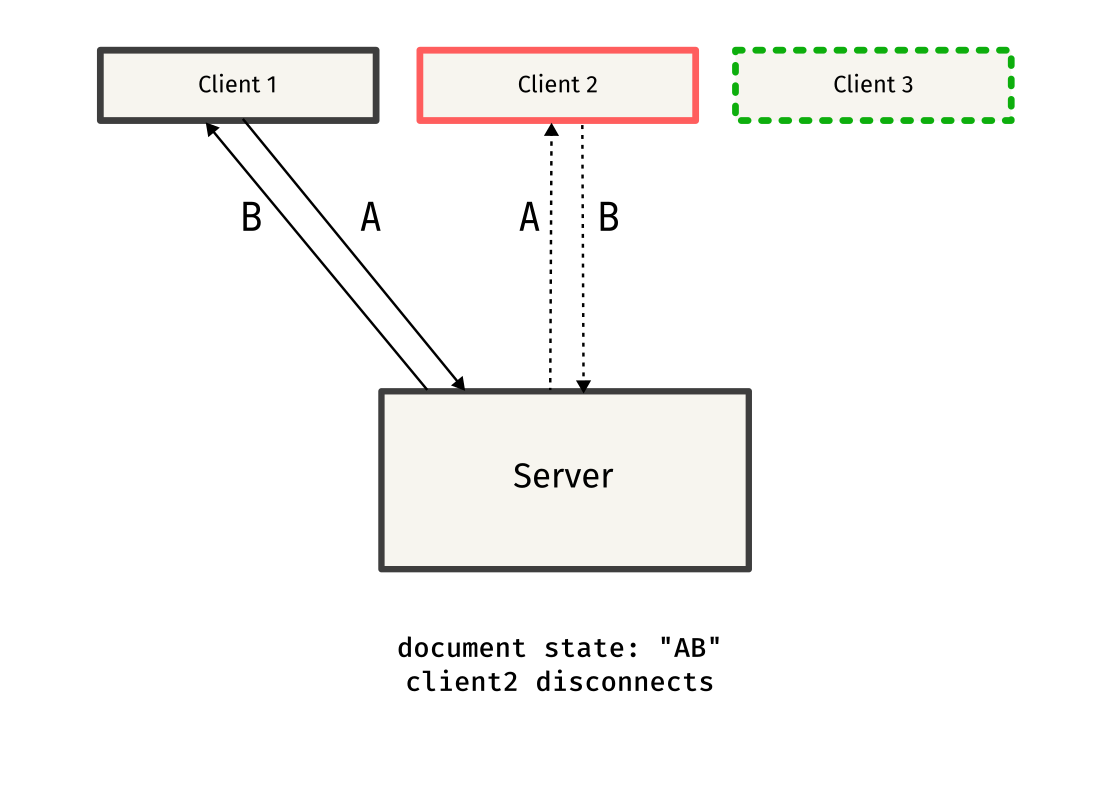
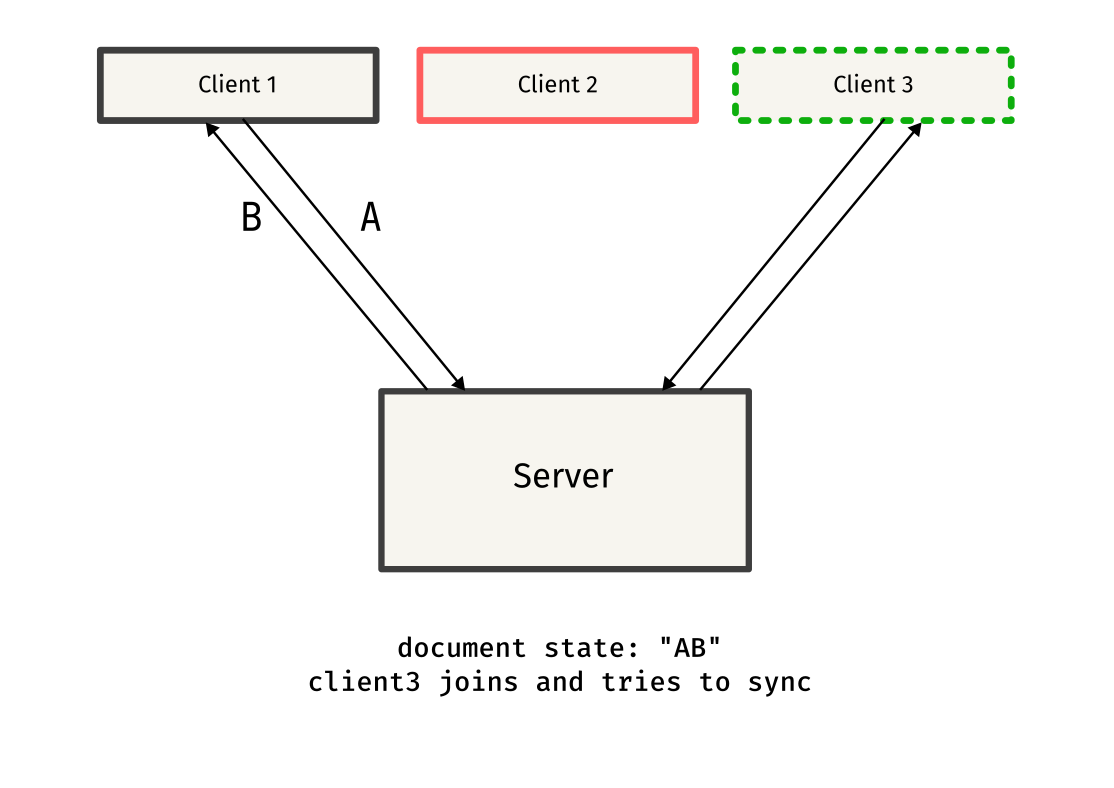
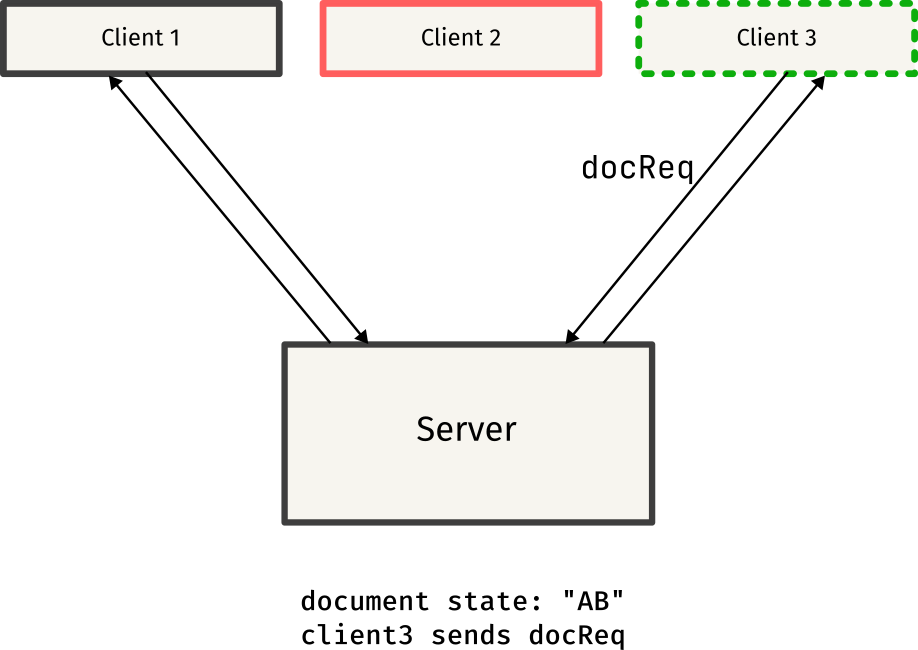
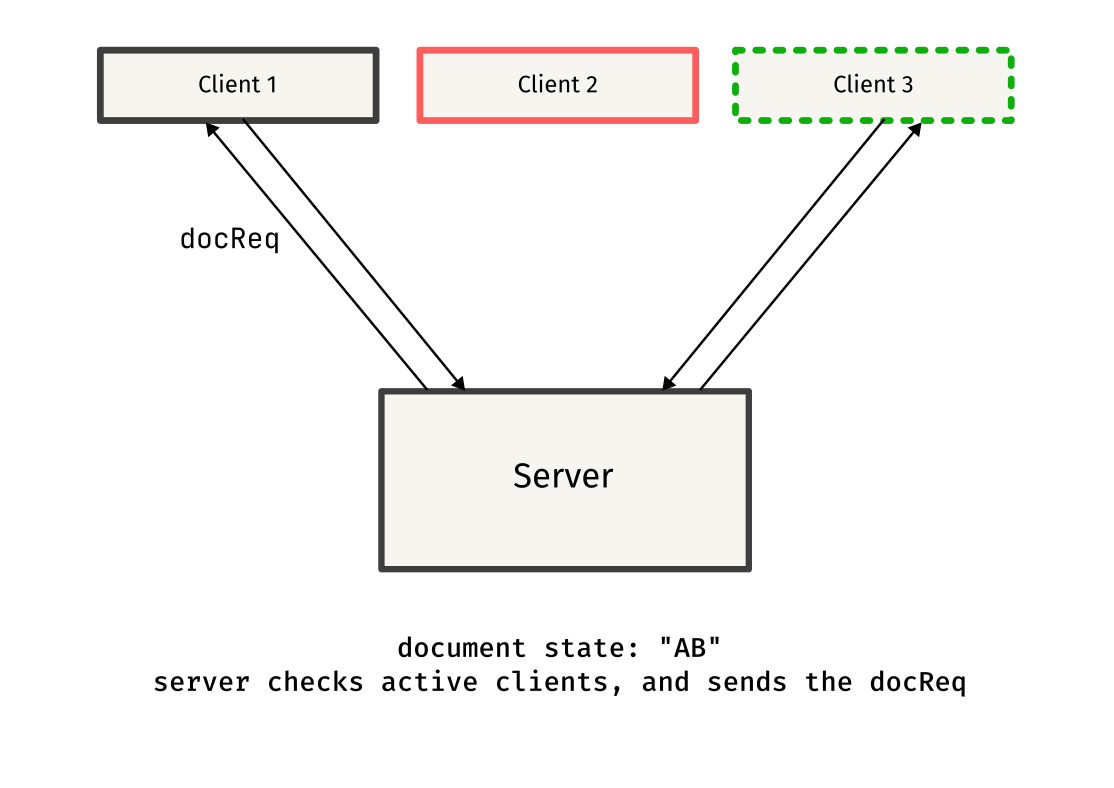
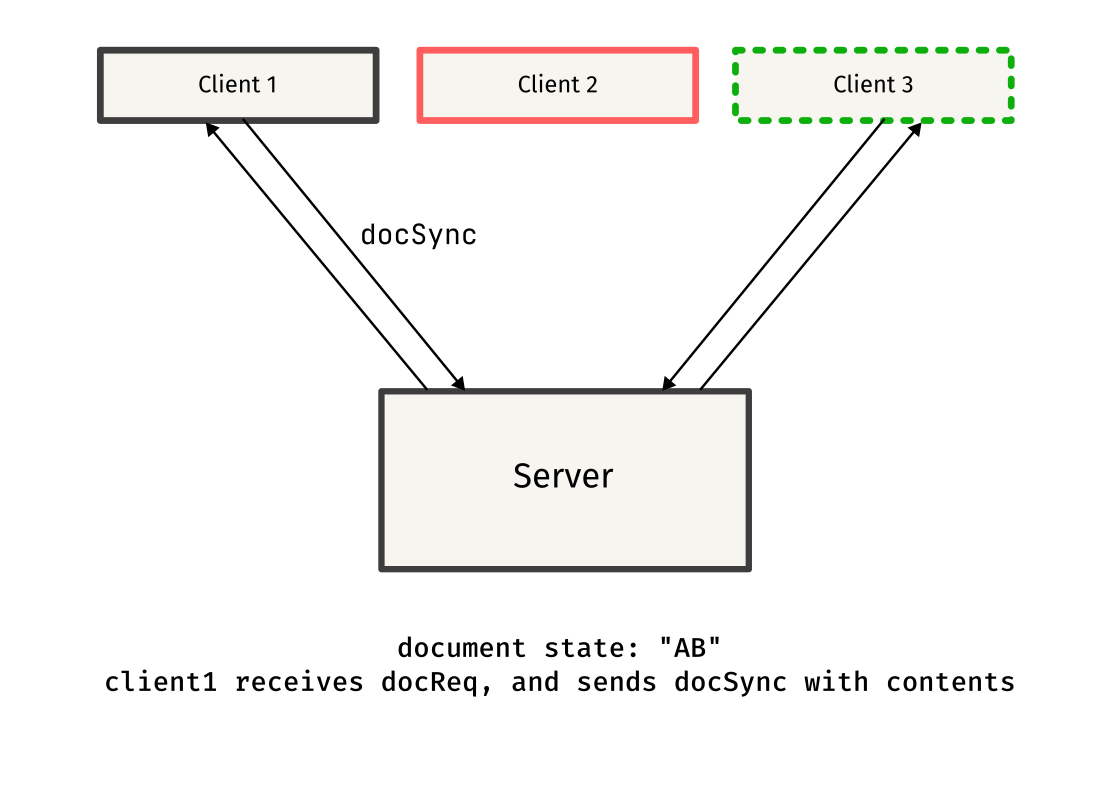
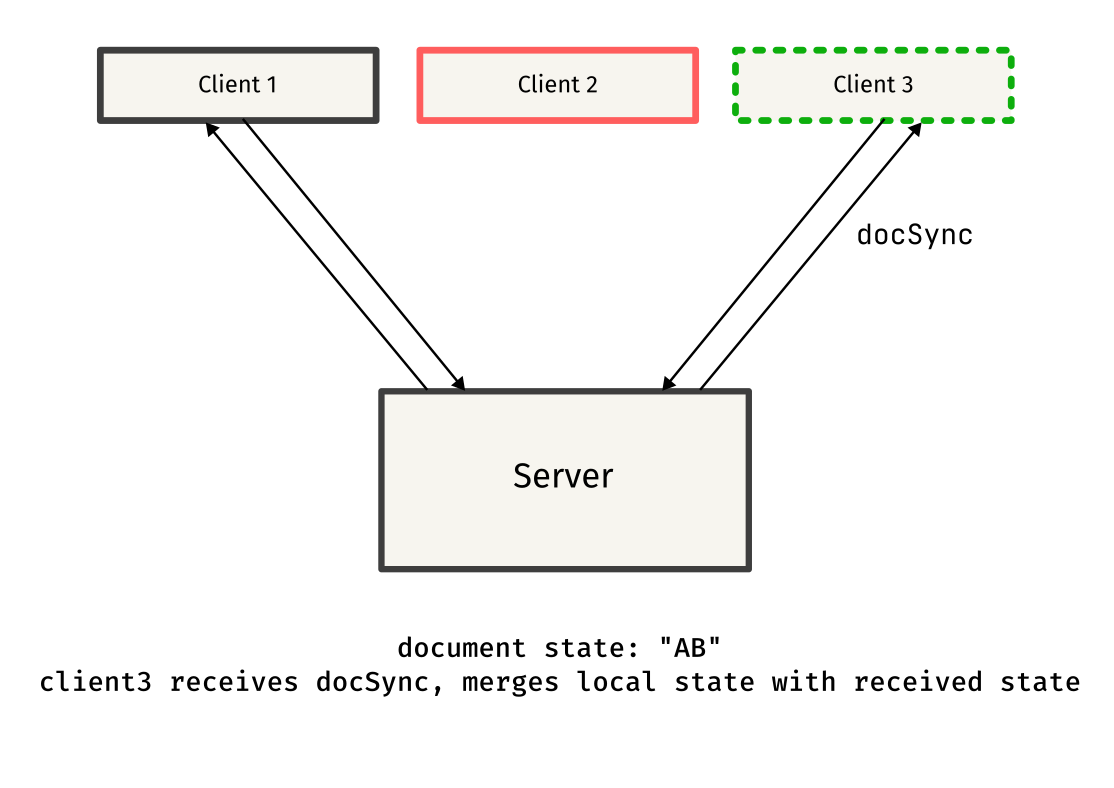
Implementing a document sync “protocol”
Remember seeing things like docReq and docSync in the above code snippets? Those were custom message types used to synchronize documents between clients.
When a client connects to the server, it has no idea on the existing state of the other clients, so it sends a docReq message to request the current document state from one of the other clients.
Once the docReq message is received by the client, it responds by sending a docSync message containing the entire document content. This message is sent to the client that requested the document, helping it sync to the current state.
This protocol might have some flaws, but it works well in most cases, and serves as a simple approach to synchronizing documents between clients.
Here is a simple overview of the protocol, explained through diagrams:
Testing it out!
For testing pairpad, I packaged it in a Docker image and used fly.io for deployments. Fly is pretty simple to get started with, and the free tier is more than enough for testing purposes.
Connecting to the server is pretty straightforward, all you need to do is:
pairpad -server pairpad.test
where pairpad.test is your server location.
I’ve tested pairpad multiple times locally, but testing it on a remote server was pretty cool! It felt like I actually built something useful that could be used by others. I was expecting latency issues and synchronization problems, but the test session went pretty well!
(I don’t have a recording of the actual session, but if you’re curious, I highly recommend you to try it out yourself!)
Is it perfect?
It definitely isn’t. pairpad started out as a fun project, and still isn’t close to completion. Software grows eternally, and there’s always room for improvement. You might even find multiple occurrences of inefficient code.
Having said that, the project is open for contributions! All kinds of contributions are welcome - code, documentation, general suggestions, etc.
Here’s a list of things which I wish pairpad could have:
- A web client
- Ability to create private rooms
- Telescope-like navigation system
- Workspaces (handle multiple files)
If you’d like to work on any of these features (or more), please consider raising a pull request!
Acknowledgements
Special thanks to Ben for making this possible - I had a great time pairing with Ben on this one! I would also like to thank these awesome people: